

Narrative Writing for kids starts with fun and creativity.
A good story lies at the heart of excellent narrative writing. This genre is relatively easy for younger students to ‘get’ as storybooks are most often the first types of text they will encounter.
As they prepare to begin writing their own narratives, though, we need to tease out of our students exactly what we mean by ‘story’. That meaning is to be found in the essential elements of a narrative.
Step 1: Learn the Essential Elements of a Narrative
Before teaching specific narrative writing strategies to your students, you’ll need to ensure they clearly understand the six essential elements of a story.
Below, we’ll review each of these story sections alongside an example of each in action chosen from the fairytale Little Red Riding Hood.
i. The Exposition: Characters and Setting
The exposition or opening of the story orientates the reader, usually by revealing the story’s setting and introducing the main character/s. It may also hint at the central problem yet to come.
Frequently, the setting and characters are closely related. For example, a science fiction story might have space as its setting and an astronaut as the main character.
Example:
“Once upon a time, there was a little girl who lived in a village near a thick forest.”
ii. The Problem: The Conflict
Without a problem or conflict, there is no story, just a list of events. Here are some examples of the more common types of conflict to be found in stories:
- Main Character vs Character: A face-off against an arch-enemy.
- Main Character vs The Self: Overcome a personal flaw.
- Main Character vs the World: A struggle against society.
- Main Character vs Nature: A battle against the environment or an animal.
- Main Character vs Supernatural: A war against the otherwordly.
Example:
“One day Little Red Riding Hood decided to take a basket of goodies to her Grandma, who lived in a little house in the forest. ‘Remember,’ her mother told her, ‘Go straight to Grandma’s house and don’t dawdle. The Big Bad Wolf is lurking in the forest.’
iii. The Rising Action: More Problems
Usually, more obstacles than one will be put in the main character’s path. These extra dilemmas help build tension as the story progresses on its way towards the climax.
Example:
“The Big Bad Wolf ran to Grandma’s house. He gobbled her up, put on her clothes, and climbed into her bed.”
iv. The Climax: The Dramatic Highpoint
The climax is when the story’s central problem comes to a head. For example, the main character might finally have that dramatic showdown with her nemesis. The climax should be the most exciting, drama-filled part of a story.
Example:
“The woodcutter burst into the room swinging a huge axe above his head. The Big Bad Wolf jumped out the window and ran deep into the forest.”
v. The Falling Action: The Winddown
Where the rising action of a story helps build tension as the story works towards its climax, the falling action relieves the tension after the drama of the climax. The falling action describes what happens directly after the climax as the story works its way towards the resolution.
Example:
“Little Red Riding Hood let out a huge sigh of relief. ‘Thank you!’ she blurted out to the woodcutter.
vi. The Resolution: Tying-Up Loose Ends
This section of the story is where the writer ties up any of the story’s loose ends.
Example:
“And from that day on, no one ever saw the Big Bad Wolf in the forest again.”
Step 2: Internalize the Elements
Students will need some practice activities to help internalize these essential elements before they can begin to structure the plot of their own stories satisfactorily.
Here are a trio of practical activities to help your younger students achieve this.
Activity 1: Identify the Elements
- Organize students into smaller groups of around three or four for this activity.
- Give students a selection of well-known stories to work on in their groups – fairy tales work well for younger students.
- Challenge the students to identify the following elements of each story: character and setting, problem, rising action, climax, falling action, and resolution.
- Groups present their findings to the class – you may wish to assign each group the same story if you want to compare and contrast each group’s decisions.
Activity 2: Plot the Plot
- Students draw one small picture in their groups to illustrate each of the elements identified in the previous activity.
- Students then draw an x and y-axis on a large sheet of paper.
- Students label the horizontal x-axis ‘Time’ and the vertical y-axis ‘Drama’.
- Students then plot each element of the narrative as it occurs chronologically from left to right. The more dramatic the story element is, the higher the plot point will be on the y axis.
- Students paste each illustration above the corresponding plot point on the graph, creating a visual representation of the story’s action.
Activity 3: Don’t Lose the Plot!
- Each group can present their graph of the story’s action to the class.
- Using their graph as a visual prompt, each group retells the story with reference to the rising and falling action as depicted in their graph.
Once your students have grasped the main elements of a soundly constructed narrative, it’s time for them to put the theory into practice.
The following fun activities will help your students begin to create their own narratives.
Step 3: Get Off to a Great Start
As we’ve seen from the essential elements section, a strong opening begins with the setting and the characters, with the central problem hot on their heels.
The purpose of these sections is to grab the reader’s attention firmly enough that they will want to continue reading the rest of the story. The following activities will help your students get off to that strong start by introducing characters and a setting, defining the central problem, and building the rising action by introducing further obstacles.
It all starts with choosing characters and a setting. We need to make this as interesting as possible for our apprentice writers. If the writer themself is not interested, how can they hope to engage the reader?
Activity 1: A Stranger in a Strange Land
- Ask students to think of as many different types of fictional stories as they can.
- Write their suggestions on the whiteboard, e.g., science fiction, fantasy, adventure, horror, romance, etc.
- Ask students to list the types of characters they would expect to find in each type of story, e.g., astronauts in a science fiction story, a young married couple in a story about a haunted house, etc.
- Write the students suggestions beside each story type on the whiteboard.
- Organize students into groups of three or four as before, and ask them to match each type of story with the most unlikely characters (at least two characters should be chosen) from the class’s suggestions. These will form the settings and characters for the stories students will write later.
Activity 2: Pick a Problem
- Students need to flesh out their characters. To do this, instruct them to write brief profiles including a physical description and some simple biographical details – use a graphic organizer to help!
- To create their central problem, students should decide on conflicting motivations for two of their characters. For example, Little Red Riding Hood’s motivation is to visit her grandma and return safely. On the other hand, the Big Bad Wolf’s motivation is to eat both Grandma and Little Red Riding Hood.
Activity 3: Raise the Stakes
- Explain to students that they can increase the dramatic tension in their story by adding further obstacles in the main character’s path.
- Give the students the task of brainstorming some additional problems they can create for their main character to solve on the way to their story’s climax.
Step 4: Bring Things to a Head
By now, the students will have worked their way to the dramatic highpoint of their story’s action, and it’s time to delve into the climax and the falling action that will lead the story down the slide of the falling action towards the narrative’s final resolution.
Activity 1: Learn from the Best
- Organize students into groups of three or four.
- Ask the students to make a list of their Top 3 Favorite Movies and Top 3 Favorite Books.
- Instruct the groups to discuss and identify the climactic moments in these narratives.
- Task students to make a list of the features of each that made each climax work. What was the main character trying to achieve? What was preventing them from achieving it? How did they achieve their goal in the end?
- Finally, ask students to think about their own story. What can they take from the climaxes of their favorite stories to help them complete their own narratives?
- Have students share their ideas with each other.
Activity 2: Wrap Things Up
- To identify the falling action, students ask themselves: What happens after the action of the climax has finished?
- To identify the resolution, students ask themselves: What loose ends from earlier in the story need to be tied up?
Step 5: Plan a Narrative
The activities above will have helped your students internalise the narrative arc’s essential elements and laid much of the preparation work for writing their story.
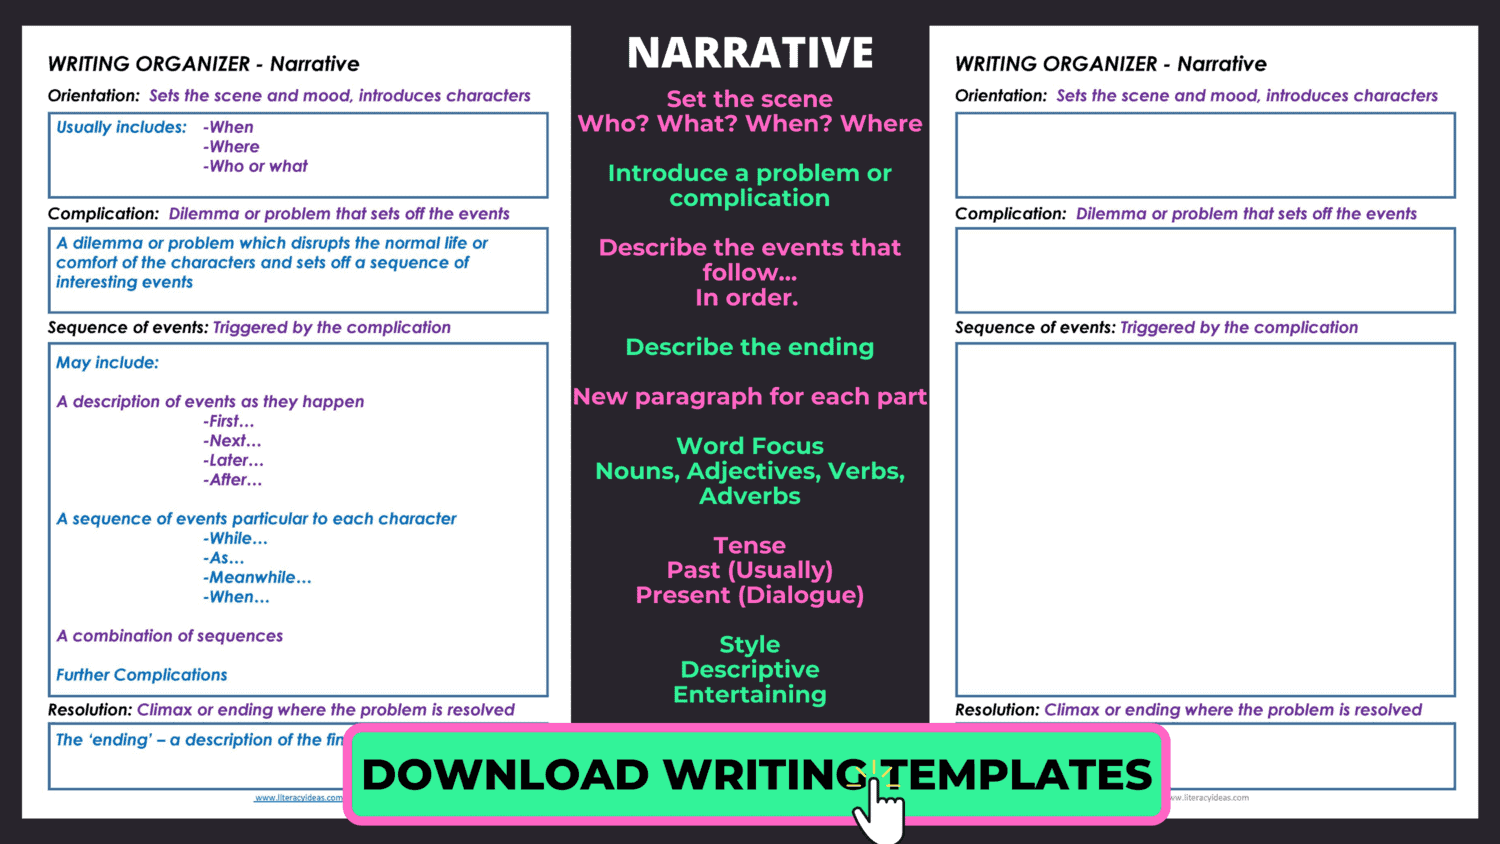
At this stage, they should be ready to map out their story using a graphic organizer. One that organizes their notes in the sequence of the essential elements listed above will help reinforce student understanding.
Once they have completed their graphic organizer, it’s time for students to zoom in on their focus, from the big picture to the finer details.
Step 6: Narrative Writing Tips
There is more to a well-written narrative than a soundly structured story arc. The writing itself must be finely crafted and filled with detail if it is to create vivid pictures in the reader’s mind and take them on an emotional journey.
The following tips will help students bring color and life to their writing.
Tip #1: Appeal to the Senses
When writing descriptions, encourage students to incorporate the five senses into their writing. Often, students focus on describing what can be seen and heard but challenge them to appeal to the other senses in their writing too. For example, what can be smelled, tasted, felt in this scene?
Tip #2: Show, Don’t Tell
This is an old-school writing standby for a good reason. Prompt students to reveal character through actions rather than directly telling the reader what they’re like. Suppose a character is greedy, for example. In that case, the student could show this by having them eating everyone’s food at a party rather than simply writing something like, ‘Stephanie was a very greedy person.’
Tip #3: Choose Just the Right Word
Writing is an excellent opportunity for younger writers to broaden their vocabulary. Help students choose just the right word to tell their tale accurately by teaching them how to use a thesaurus. Choose one that is suited to your students’ ages and abilities. You’ll find a tremendous kid-friendly online thesaurus here.
Tip #4: Select Powerful Verbs
Due to their more straightforward nature, stories written by younger students are generally action-driven rather than character-driven. In such cases, verbs will drive the action of the narrative. Therefore, encourage students to select strong verbs to create that compelling narrative that readers love to read.
Tip #5: Edit – Always!
Younger students need to learn the importance of drafting, editing, and proofreading when writing any type of text. As story writing is often their first experience of extended writing, teachers should take the opportunity to create good editing habits from the start.
A COMPLETE UNIT ON TEACHING NARRATIVE WRITING
Teach your students to become skilled story writers with this HUGE NARRATIVE & CREATIVE STORY WRITING UNIT. Offering a COMPLETE SOLUTION to teaching students how to craft CREATIVE CHARACTERS, SUPERB SETTINGS, and PERFECT PLOTS.
Over 192 PAGES of materials, including:
Conclusion
No doubt about it; there’s a lot to narrative writing. Luckily, most of our younger students will already be familiar with many of the basic conventions of storytelling from their years of listening to bedtime stories and watching their favourite cartoons. This is why emergent writers usually learn to write narratives before many other text types.
Of course, narratives play such a crucial role in a student’s early years because children love stories. We all do! So, while there is quite a lot for students to work on, narrative writing is usually an easy sell.
With an understanding of the basic underlying structures and a little imaginative flair, your students will produce entertaining stories in no time.