Our students encounter procedural texts all the time.
Whether in the form of homework instructions or a recipe, procedural texts help our students learn how to do and make things.
These texts come in many forms. Fortunately, however, many standard features are shared by each of these different forms. Once students have a firm grip on these standard features, they can confidently and competently produce texts across many of these specific procedural text types.
In this article, we’ll walk through the various aspects of procedural texts that students must practice to master this writing genre.
From exploring the purpose of procedures to drilling down into their distinct language features, students will soon grasp how to plan, prepare, and execute on writing their own procedural text.
There is no better time to get started on How to Master Procedural Writing in a Single Week with these top 5 lesson plans.
And remember, if you need to brush up on the purpose and function of a procedural text, be sure to read our complete guide here.
Procedural Writing Lesson Plans: # 1: The Purpose of Procedural Writing
To begin the process of becoming a confident producer of procedural texts themselves, students will first need to gain a strong understanding of the purpose of this type of writing.
Procedure texts, essentially, do one of two things. They either teach us how to do something, or they teach us how to make something.
For example, this article is itself a procedural text – meta, I know!
Students usually grasp the purpose that defines a procedural text fairly quickly. Still, they can often be surprised to discover just how many different text types can fall into this category.
One way to allow them to explore this is to organize them into groups to research how many different text types they can find, which can be categorized as procedures. They may do this in the school library or by exploring a virtual library or bookstore online.
Students should also brainstorm different procedural texts they encounter daily, as this text type often doesn’t come in the form of a book or other extended writing form.
Challenge the students to make a list of as many different text types that fall into the procedures category as they can.
Some answers might include:
- Cookbooks
- Recipes
- Instructions
- Carpentry books
- Gardening books
- Game rules
- Agendas
- Directions
- Guides
Gather together some examples of procedural texts to examine together as a class. Discuss with the students the different specific purposes of each text and ask them how this relates to each text’s title. Often, procedural texts have How to -type titles.
Can the students develop some ideas for the titles for procedural texts they could write based on their own knowledge and skills?
THE COMPLETE GUIDE TO WRITING A PROCEDURAL TEXT (4:30 minutes.)
Procedural Writing Lesson Plans: # 2 The Structure of a Procedural Text
As mentioned, there are many different types of procedural texts. One of the more common types of procedures we encounter in our daily lives is instructions.
Instructions contain most of the more common structural features throughout the broader genre and, for that reason, we’ll place much of our focus on instruction writing for the remainder of this artic
Once they have a clear grasp of the purpose of procedural texts, it’s time for students to drill down into how they’re structured.
While instructions have some particular structural characteristics, the broad features can be easily adapted to fit the needs of various other types of procedural texts.
Instructions are designed to take the reader through a step-by-step process in an easy-to-follow manner. Whether informing us how to build a Lego design or how to assemble a bookshelf, instructions are a commonplace and necessary part of our lives.
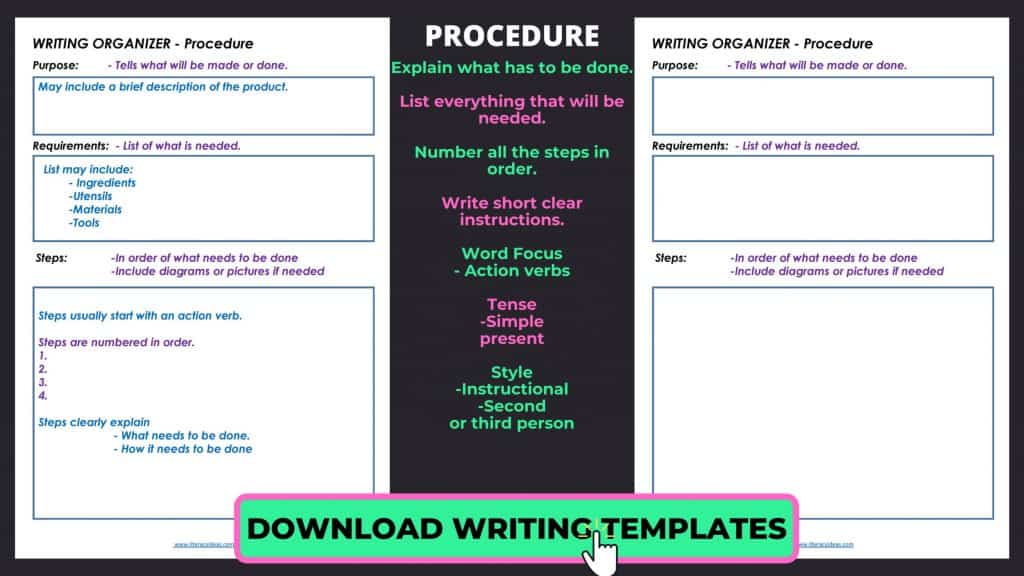
The writing of any instructional text should begin with the four basic elements that serve as The Four Pillars of Procedural Writing. These are:
- The Aim – What is to be done or made by following this text?
This will often be encapsulated in the title. For instructions, this will usually be in the How to form.
- The Resources – What will I need?
This section lists all the items and equipment needed to complete the procedure successfully. In instruction writing, this section may also be titled Materials, Ingredients, Components, Items Needed, etc. Whatever students call them, it’s good practice for them to present the items here in the order that they’ll be used in the process.
- The Steps – How will it be done?
This is where the real meat of the writing lies. Students list the process’s steps in a logical progression that leads the writer from ignorance to competence. This section is often called The Method or Directions.
- The Conclusion – Has the procedure been completed?
In this section, the reader is usually offered some advice on how to evaluate whether or not they’ve completed the task correctly. Sometimes this will take the form of a diagram or illustration which displays what the final result should look like.
Students can learn to think in terms of these four pillars by first identifying them in texts written by others.
Organize students into groups and provide them with a range of different types of instructions. Students should discuss how each text is organised according to the four pillars described above. They can then also choose a model text to present to the class.
At this point, students could also design a simple Four Pillars graphic organizer to help them later when it comes to planning their text.
Procedural Writing Lesson Plans: # 3 The Features of Instructions
Once students have slotted in the essential pieces of the structural puzzle, it’s time to fill in their understanding of instructions with more fine detail.
As students learn about the various features of writing instructions, compiling a list of these features as they’re introduced will be worthwhile. These can then be used to create a comprehensive checklist that will be invaluable during the writing and editing process.
A beneficial exercise to begin the process is to provide groups of students with sample instructions and task them to identify and note its characteristic features.
Essentially, they will reverse engineer a checklist they can use later during the writing and editing process. Students can give feedback as a whole class while you scribe ideas on the whiteboard, making suggestions for items they may miss.
Features students will need to recognize and understand will include:
The Title
We’ve already mentioned how instructions usually follow the How to format. The student should leave no doubt in the reader’s mind about what they will learn to do or make by following these instructions.
The title can also help focus the student on the writing process. Everything they add to their document can be checked against the title – does it help answer the title’s question?
Stylistically, titles will usually be in bold type.
The Body
Instructions should be written in clear, straightforward language that is easy to follow by the reader.
The title is frequently oriented enough for the reader. But, occasionally, an introductory paragraph may also be used in longer, more complex instructions.
The various sections of the text beneath the title can helpfully be organized using various subheadings such as:
- Resources
- Method
- Diagram
Bullet points or numbered steps help lay the information out in a logical, coherent manner.
Breaking information down into smaller, more manageable chunks makes it more digestible for the reader. This makes for an efficient way to communicate information quickly. Students should keep each step short and to the point.
The language features of instruction are significant, and we’ve already touched on how students should favour straightforward language when writing this type of text.
There are a few other areas of language our students need to consider when writing their instructions. Let’s take a look at the most important of these.
Helping students follow through on the instructions chronologically, time connectives are often used to begin each bullet point or numbered step. Some time connectives commonly found at the beginning of each step include:
- First
- Next
- Then
- After that
- Now
- Finally
A comma should follow each time connective before the next language element is introduced, that is, imperatives.
Imperatives can be thought of as ‘bossy’ words that tell the reader to do something. If the time connectives indicate the ‘when’ of the instruction, the imperatives indicate the ‘what’. Some commonly used imperatives in instruction writing include words like:
- Take
- Open
- Cut
- Seal
- Stick
- Bend
- Pull
- Place
So, each step of the instructions will follow a formula something like:
Time Connective + Imperative + Rest of Instruction
To see this in action, let’s take a look at some simple instructions for tying shoelaces. You can share these with students as an example to model. Imperatives are in bold.
- First, take an end of the shoelace in each hand.
- Then, thread one lace over the other and pull tight.
- Next, make a loop with one of the laces.
- Now, wrap the other lace around the loop.
- Finally, pull the shoelace through the hole to form another loop and tighten.
Students may notice too that the text speaks to the reader from a second-person point of view.
Sometimes this is implicit, but at other times the reader can be addressed directly with the pronoun ‘you’.
Images
Images of various types can be used to reinforce the verbal instructions of the text. They can also be used to illustrate for the reader what the finished product will look like – you can’t be it if you can’t see it!
For example, a recipe might include a photograph of the completed dish. Complicated assembly instructions for flat-pack furniture might include a labelled diagram.
Increasingly these days, complex assembly tasks include links to online video tutorials hosted on video-sharing platforms such as YouTube, bringing the instruction writing genre into a multimedia format.
Procedural Writing Procedural Writing Lesson Plans: # 4 Planning and Preparation
Having broken instruction down into its component parts, it’s time for students to gain some practise assembling those parts in their own design.
If independent enough, you can ask students to generate their own titles. Perhaps something uncommon that they specifically know how to do. A technique from an unusual hobby, for example.
Whether students choose their topics or you provide one for them, their topic must be exciting, engaging, and something they know well.
When jotting down their notes, students can use the graphic organizers we mentioned in this article and the criteria list they worked on earlier in the week.
An excellent planning activity to prepare them for writing their instructions is to have them give verbal instructions first. If possible, the student can guide a partner through the procedure by giving spoken commands exclusively.
When their partner performs the process incorrectly, this provides feedback to the student about a lack of clarity in their instructions. This information can then be used to inform the writing process. This brings us neatly to Day 5.
Procedural Writing Lesson Plans: # 4 Extended Writing
Thoroughly planned and well-prepared, it’s now time for the students to put it all into practice.
A session of at least 45 minutes should be ample time to complete the writing. Remind students to use their planning organizers and criteria lists to provide a roadmap through the writing process and ensure they include all the necessary elements in their work.
When students have finished, they should take some time to review each other’s writing and offer constructive criticism where appropriate. Critiquing the work of others is a good practice that helps the critiqued improve their work and helps the critic.
Constructive criticism in hand, students can redraft their writing over the weekend to submit a polished, well-written piece of procedural writing on their teacher’s desk first thing Monday morning!
Conclusion
Following the directions above, students will fully grasp the main elements of instruction writing by the end of the week.
This aspect of drafting, redrafting, editing, and proofreading is essential to the writing process. It should be consistently reinforced whenever possible when students are doing extended writing outside exam conditions.
Much of the knowledge and skills your students will have acquired and honed this week are also transferable to other procedural texts. Be sure to create opportunities to build on this understanding by working on other procedural texts such as game rules, agendas, directions, and guides.


